
Overview
The flowchart depicts the input, each of the Playbacks, and the output including information about the current and future states of each. The chart is arranged as a uni-directional array of sources, beginning with Input, flowing through each of the Playbacks, and then finally to the Output layer. This model represents the true flow of DMX content through CueServer.
The input layer shows an overview of the CueServer inputs and universes, including the states of each input and whether or not input is enabled. The Playback layers provide an overview of each playback, including its current status, next status, and various properties. The output layers displays the an overview of the CueServer’s outputs and universes, along with the states of each.
Input
This layer shows the patched universes and the inputs assigned to each. Next to each input source is a status indicator that conveys the current state of that source. Solid green indicates that a signal is being received from the source, while black indicates that no signal is being detected. The status indicator may also blink red or yellow if there is a problem with the source.

Click the ellipsis ( ![]() ) button in the top-right to enable or disable the input layer. When input is disabled CueServer will not pass input values through to the playbacks, the input layer’s arrow will be broken, and a crosshatch pattern will cover its universe blocks.
) button in the top-right to enable or disable the input layer. When input is disabled CueServer will not pass input values through to the playbacks, the input layer’s arrow will be broken, and a crosshatch pattern will cover its universe blocks.

More information about indicator states can be found in the DMX Ports section.
Playbacks
Each Playback has three panes, the left-hand pane shows what is currently loaded in the Playback, the center pane shows what’s coming up next, and the right-hand pane shows additional properties for the Playback. While cues are running and/or channels are fading, bar graphs appear that show the progress of the cues, fades, streams, etc.
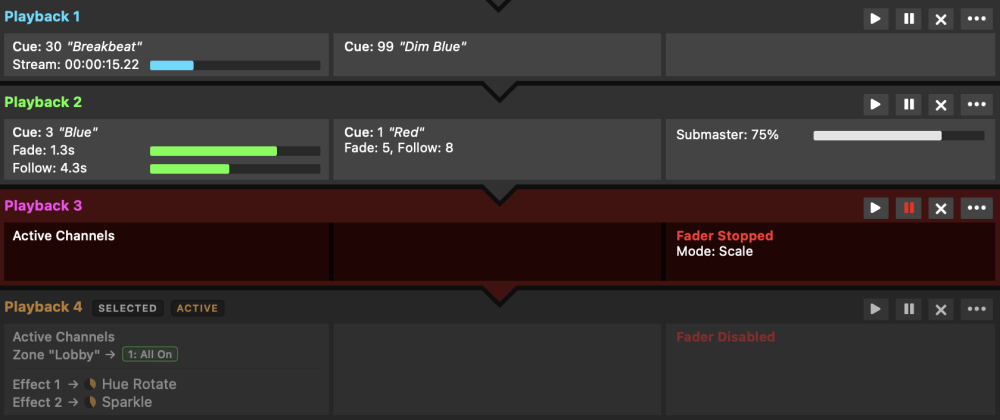
In the example above, Playback 1 is currently playing back Cue 30, which is a streaming cue called “Breakbeat”. It is currently 15.22 seconds into the stream. The next cue in Playback 1 is Cue 99, which is called “Dim Blue”. Playback 2 is currently fading into Cue 3 “Blue”. The fade has 1.3 seconds remaining, and a follow timer is running with 4.3 seconds remaining. The next cue in Playback 2 is Cue 1 “Red”, and that cue will have a Fade Time of 5 seconds, and a Follow Timer of 8 seconds. Also, Playback 2’s submaster has been lowered to 75%. Playback 3 has manually set “active” DMX channels in it and no next cue. Playback 3 is “stopped”, meaning that fade and follow timing is disabled, and its layer mode is set to “Scale”. Playback 4 is the active playback, it has Preset 1, named “All On”, active in the zone “Lobby”. Playback 4 also has two effects running, “Hue Rotate” and “Sparkle”, but is currently disabled, so it will not contribute to the DMX output.
The Current Pane (Left Side)
The pane on the left-hand side of each Playback shows what is currently loaded in the Playback.
- Empty – Shown if the playback has no active channels. An empty Playback has no effect on the DMX output.
- Active Channels – Shown when the Playback has active channels (not originating from a Cue).
- Cue (n) – Shown when the Playback is loaded with the channels from a particular Cue.
- Cue (n) + Changes – Shown when the Playback was loaded with a Cue, and then manual channel values were changed.
- Fade (time) – Shown when the Playback is actively fading channels. A progress bar and numerical countdown show the fade time remaining.
- Follow (time) – Shown when the Playback is counting down to an auto-follow event. A progress bar and numerical countdown show the follow time remaining.
- Stream (time) – Shown when a Streaming Cue is being played back. A progress bar and numerical countdown show the stream time remaining.
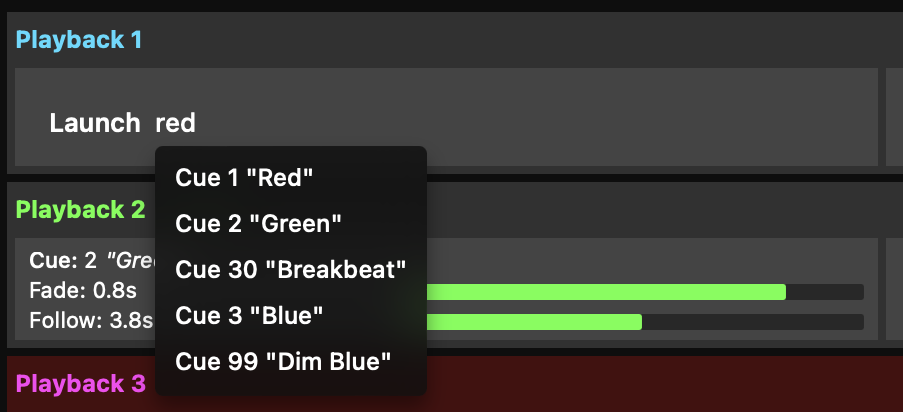
Left-click on the pane to type in a Cue number, name, or keyword. Typing a number followed by the enter key will immediately launch that Cue. Typing a name or keyword will bring up a list of matching Presets and Cues to select from. You can click an item in the list, or use the arrow keys to traverse the options and then press enter on the option you want. Click outside of the pane, or press the escape key, to cancel.
Right-click on the current pane to access a quick-launch menu with options to clear the Playback, or select a Cue/Preset from a list.
Click on the Playback title, or name if defined, to quickly set the Playback as active.
The Next Pane (Center)
The panel in the center of each Playback shows what is queued to be “next”.
- Cue (n) – Shown if the Playback has a next cue that will execute upon a Go command or auto-follow.
- Fade (time) – Shown to indicate the fade time of the next cue.
- Follow (time) – Shown to indicate the follow time of the next cue.
- Link (n) – Shown to indicate the link of the next cue.
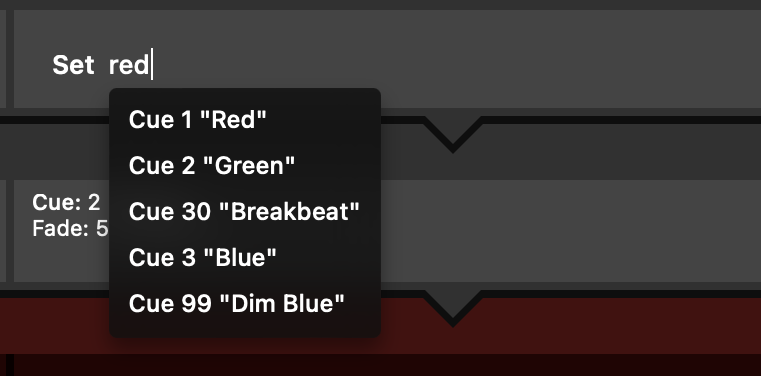
Left-click on the pane to type in a Cue number, name, or keyword. Typing a number followed by the enter key will set that Cue as next. Typing a name or keyword will bring up a list of matching Presets and Cues to select from. You can click an item in the list, or use the arrow keys to traverse the options and then press enter on the option you want. Click outside of the pane, or press the escape key, to cancel.
Right-click on the next pane to access a quick-set menu with options to clear the next pane, or set a Cue/Preset from a list.
The Properties Pane (Right Side)
The panel on the right-hand side of each Playback shows additional properties for the Playback Fader. Right-clicking on the properties pane will present a quick-action menu to enable/disable the playback or change the playback mode.
The properties that appear in the status pane are:
- Stack (name) – Shown if the Playback has a cue stack assigned to it.
- Fader Stopped – Shown in Red color when the Playback is stopped. A stopped Playback has its timing overridden, meaning that setting channel levels or executing cues always appear immediately (they do not fade), the follow timer does not run, and streaming cues are paused.
- Channels Locked – Shown in a yellow color when channels in the Playback are locked. Locked channels retain their current values and cannot be modified by executing cues or by using the Channel, At, Release, or Clear commands. Locked channels must either be Unlocked, or the CueServer can be Reset.
- Submaster (level) – Shown when the Playback’s submaster level is not at 100%. A white progress bar shows the submaster percentage. Click and drag on the progress bar to set its level.
- Mode (mode) – Shown if the Playback’s combine mode is set to anything other than the default “Merge” mode. Options include Override, Scale, Pin, Crossfade, and Mask.
At the top-right of this pane you will find a set of 4 buttons:
- Play Button (
![]() ) – play the next Cue
) – play the next Cue - Pause Button (
![]() ) – start/stop the Playback fader
) – start/stop the Playback fader - Clear Button (
![]() ) – clear the Playback fader
) – clear the Playback fader - Ellipsis Button (
![]() ) – open the Playback menu
) – open the Playback menu
The playback menu contains the following options:
- Go – play the next Cue.
- Go Cue… – play a selected Cue from the Playback’s active Cue List.
- Go First Cue – play the first Cue in the Playback’s active Cue List.
- Set Next Cue… – set a selected Cue from the Playback’s active Cue List as the next Cue.
- Set Cue Stack… – assign a Cue Stack to the Playback (if any are defined).
- Release – release the Playback’s channels.
- Clear – clear the Playback.
- Assert – raise the priority of the Playback’s LTP (Latest Takes Precedence) channels.
- Active – set the Playback as active.
- Previous Playback – set the previous Playback as active.
- Next Playback – set the next Playback as active.
- Lock Selected Channels – lock the currently selected channels in the Playback.
- Unlock All Channels – unlock all channels in the Playback.
- Submaster… – set the Playback’s submaster level from a list of options.
- Enabled – toggle the Playback’s enabled state.
- Stopped – toggle the Playback’s stopped state.
- Merge – set the Playback to Merge mode (default).
- Override – set the Playback to Override mode.
- Scale – set the Playback to Scale mode.
- Pin – set the Playback to Pin mode.
- Crossfade – set the Playback to Crossfade mode.
- Mask – set the Playback to Mask mode.
Output
This layer shows the patched universes and the outputs assigned to each. Next to each output is a status indicator that conveys the current state of that output. Solid green indicates that a signal is being sent, while black indicates that no signal is being sent. The status indicator may also blink red or yellow if there is a problem with the output.
Left-click on a universe block to enable or disabled it. When a universe is disabled, it will appear with a crosshatch pattern and no longer output data via sACN, Art-Net, or KiNet.

More information about indicator states can be found in the DMX Ports section.